
Bright Ideas for Your Landscape Lighting Residential Setup
Why Your Landscape Lighting Electrical Setup Matters More Than You Think
A proper landscape lighting electrical setup can completely change how your home looks and feels after dark — and in the Indianapolis area, it does a lot more than just look good.
Here is a quick overview of what a residential landscape lighting electrical setup involves:
| Step | What It Involves |
|---|---|
| 1. Choose your system | Low voltage (12V) for safe, flexible residential systems; line voltage (120V) for high-output professional systems |
| 2. Size your transformer | Add up fixture wattages; size transformer to at least 120% of that total |
| 3. Plan your wire runs | Keep runs under 100 feet on 12 AWG cable to prevent voltage drop |
| 4. Connect fixtures | Use weatherproof connectors; bury cable at least 6 inches deep |
| 5. Set up automation | Program timer and photocell for automatic dusk-to-dawn operation |
| 6. Test before burying | Verify voltage at each fixture before covering any wire |
Well-placed lights along a walkway or driveway help prevent trips and falls. Motion-activated floodlights deter intruders. And after an Indiana spring storm knocks out power or rattles your existing wiring, a properly installed system bounces back — while a poorly wired one fails quietly underground where you can’t see it.
Professional landscape lighting installation in the Indianapolis area typically ranges from $800 to $3,000 or more, depending on system size and complexity. That range reflects real differences in materials, wiring methods, and long-term reliability — not just labor.
I’m Clay Hamilton, President of Grounded Solutions, and with over two decades of hands-on electrical experience, I’ve designed and installed countless landscape lighting electrical setups across central Indiana’s southern suburbs. In this guide, I’ll walk you through everything you need to know to get this done right — and why professional installation is the key to a beautiful, long-lasting system.
Low Voltage vs. Line Voltage Landscape Lighting Electrical Setup
When designing an outdoor lighting system, the first major decision is choosing between a low-voltage (12V) and a line-voltage (120V) system. This choice dictates the safety profile, installation complexity, and overall flexibility of your property’s exterior electrical grid.
| Feature | Low Voltage (12V) Systems | Line Voltage (120V) Systems |
|---|---|---|
| Primary Voltage | 12V or 15V AC (stepped down via transformer) | 120V AC (standard household utility power) |
| Safety Level | Exceptionally high; virtually zero risk of serious shock | High shock hazard; requires professional installation |
| Burying Depth | Minimum 6 inches deep | Minimum 18 inches deep (or deeper in conduit) |
| Permits Required | Rarely required for low-voltage side | Yes; typically requires local permits and inspections |
| Energy Efficiency | High (optimized for modern LED technology) | Moderate to low (historically optimized for high-power lamps) |
| Fixture Flexibility | Extremely easy to move, adjust, or expand | Fixed; requires junction boxes and rigid conduit runs |
For the vast majority of residential properties in central Indiana, a low voltage outdoor lighting system is the superior choice.
Low-voltage systems operate by taking the standard 120V household electricity from an outdoor outlet and stepping it down to a safe 12V or 15V current using a specialized magnetic or electronic transformer. Because 12V electricity cannot easily penetrate human skin, it poses no meaningful electrical shock risk. This makes low-voltage lighting highly adaptable; you can easily adjust, relocate, or add fixtures as your landscaping matures over the years.
Line-voltage systems, on the other hand, run on the same raw 120V power that feeds your indoor appliances. They are highly complex, require heavy-duty commercial-grade materials, and carry a high risk of lethal shock if a wire is accidentally severed by a shovel or lawnmower. Line-voltage setups are typically reserved for high-output commercial parking lot lights, massive security spotlights, or specialized architectural features on sprawling estates.
By utilizing modern LED technology, a low-voltage system can easily match the brightness and coverage of older line-voltage halogen systems while drawing up to 80% less power. This massive reduction in energy consumption makes low-voltage systems the industry standard for safe, efficient, and beautiful home illumination.
Planning and Engineering a Reliable Outdoor System
An exceptional outdoor lighting system is not designed by randomly sticking fixtures into the grass and plugging them in. It requires meticulous planning and engineering to ensure that every light shines with consistent brightness, the system survives severe weather, and the electrical infrastructure is not overloaded.
When we design a landscape lighting layout for a home in the southern suburbs—such as Beech Grove, Franklin, Whiteland, Southport, or Mooresville—we start by analyzing the property’s physical topography and existing electrical capacity. High-quality planning prevents common design mistakes, such as spacing pathway lights too closely together (which creates a commercial airport “runway” effect) or placing fixtures where they will be easily damaged by lawnmowers.
For pathway lighting, a good rule of thumb is to space fixtures roughly 8 to 10 feet apart, keeping them within 6 inches of the path’s edge to ensure even, overlapping pools of light without blinding glare. We also map out focal points like mature trees, architectural columns, and water features to create layers of light that add depth and security to your home.
Understanding the benefits landscape lighting provides—from deterring crime to expanding your evening living spaces—helps us determine exactly where to place accent lights, path lights, and uplights for maximum impact.
Calculating Load and Sizing the Landscape Lighting Electrical Setup Transformer
The heart of your low-voltage system is the transformer. It is responsible for stepping down household power and distributing it to your fixtures. To select the correct transformer size, you must calculate the total wattage load of your planned lighting design.
To calculate your minimum transformer size, add up the total wattage of all the fixtures you plan to install, then multiply that sum by 1.2 to build in a 20% safety margin (commonly known as the 80% load capacity rule).
$$\text{Minimum Transformer Wattage} = \text{Total Fixture Wattage} \times 1.20$$
For example, let’s compare a modern LED system against an older halogen setup to see how LED technology drastically reduces transformer load:
- LED Setup: 15 path lights and uplights drawing an average of 4 watts per fixture equals a total load of 60 watts. Multiplying by 1.2 gives a target of 72 watts. A standard, highly reliable 100-watt transformer is perfect for this system and leaves plenty of room for future expansion.
- Halogen Setup: 15 comparable halogen fixtures drawing 30 watts each equals a massive 450-watt load. Multiplying by 1.2 gives a target of 540 watts, requiring a massive, expensive 600-watt commercial-grade transformer.
Furthermore, LED bulbs boast an impressive lifespan of 25,000 to 50,000 hours, compared to a meager 2,000 to 4,000 hours for traditional halogens. By engineering your system around low-wattage LEDs, you save money on the transformer, keep your utility bills low, and virtually eliminate the need for seasonal bulb replacements.
Preventing Voltage Drop in Your Landscape Lighting Electrical Setup
Voltage drop is the natural reduction in electrical tension that occurs as current travels along a copper wire. Because copper wire has internal resistance, electrical energy is gradually lost as heat over long distances. If your system is poorly engineered, the fixtures closest to the transformer will receive a full 12 volts and shine brightly, while the fixtures at the far end of the line might only receive 9 or 10 volts, resulting in dim, flickering, or completely non-functional lights.
To maintain consistent brightness across your entire property, we aim for a target of 11.5 volts at every single fixture, with a maximum allowable variation of less than 0.5 volts across the system.
To prevent voltage drop, we utilize three primary engineering strategies:
- Use Thicker Wire Gauges: Standard low-voltage cable is typically 12 AWG (American Wire Gauge) or 10 AWG. The lower the gauge number, the thicker the copper wire and the lower its internal resistance. We keep individual wire runs under 100 feet when using 12 AWG cable. For runs exceeding 100 feet, we automatically upgrade to heavier 10 AWG cable.
- Account for Return-Path Loss: A common mistake made by inexperienced installers is forgetting that electricity must travel in a complete loop. A 75-foot run from the transformer to the last light actually behaves like a 150-foot electrical path when calculating total voltage drop.
- Utilize Multi-Tap Transformers: Professional-grade transformers feature multiple output terminals, or “taps,” ranging from 12V up to 15V. If we have a long wire run that experiences unavoidable voltage drop, we can connect that specific run to a 14V or 15V tap. This boosts the starting voltage at the transformer so that after the natural voltage drop occurs along the run, the electricity arriving at the furthest fixtures sits perfectly at the target 11.5V to 12V range.
For a detailed technical breakdown of wire sizing and distance calculations, you can consult the Landscape Lighting: Low Voltage Wiring Guide – WireRef to see how electrical resistance scales over distance.
Professional Wiring Methods and Weatherproofing for Indiana Storms
Central Indiana is famous for its volatile weather. From freezing winter ground-heaves to torrential spring downpours and severe summer thunderstorms, your outdoor electrical system must be built like a fortress to survive.

The physical wiring method you choose determines how well your system distributes power and how easily it can be serviced. There are three primary wiring layouts used in residential applications:
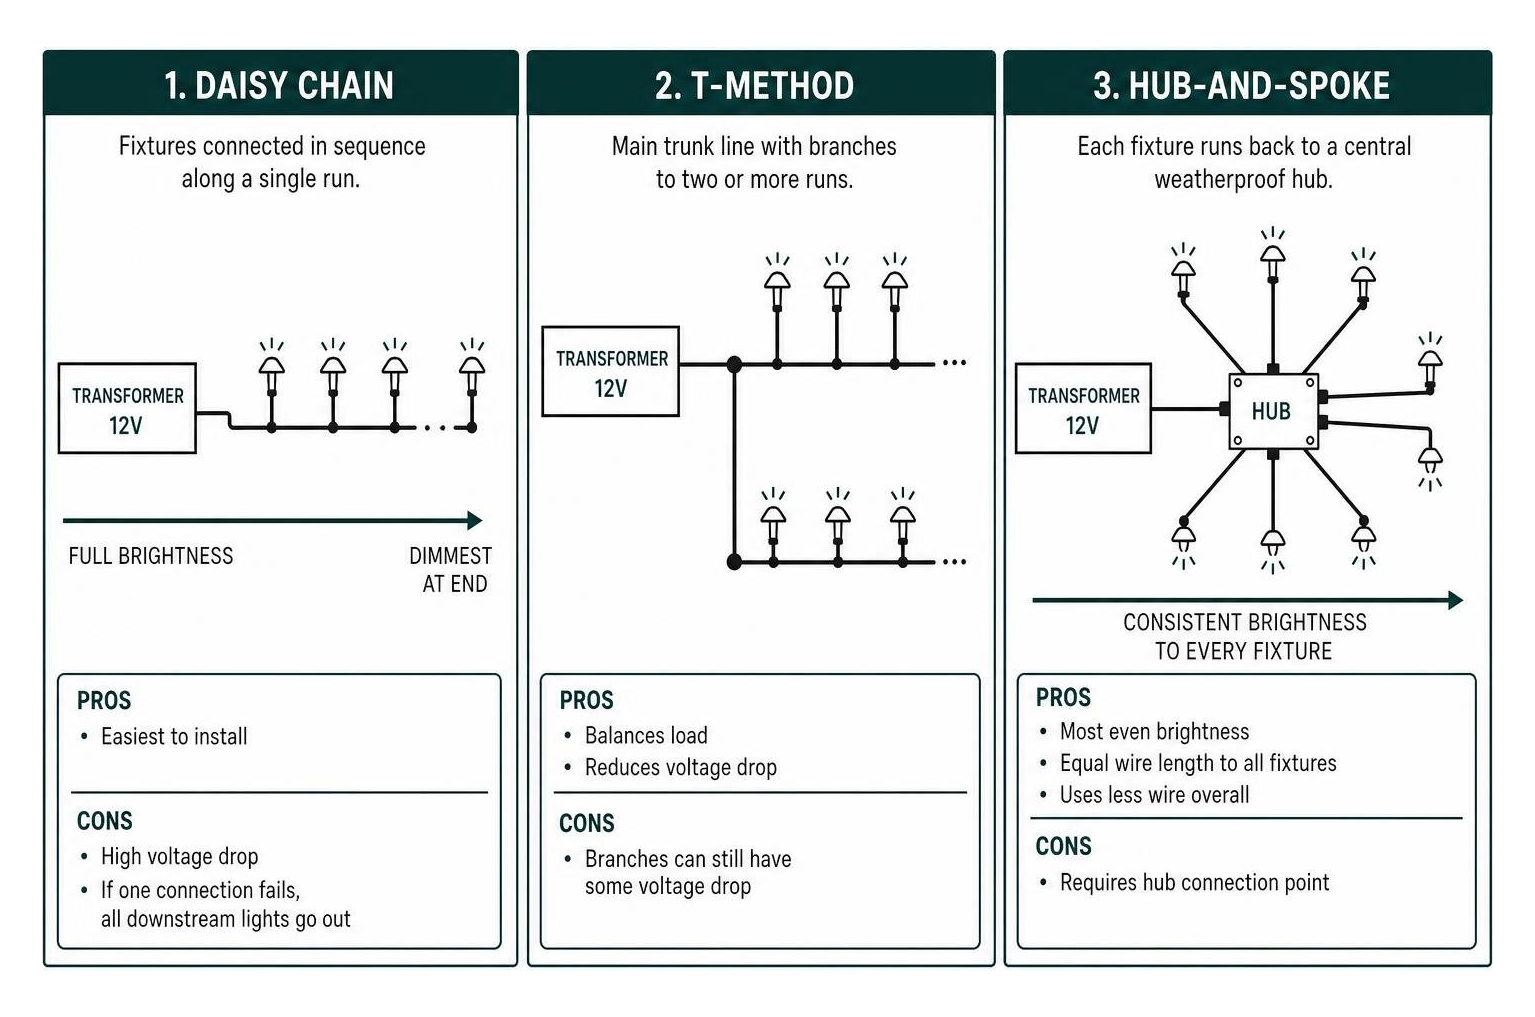
- Daisy Chain Layout: This method connects fixtures sequentially along a single cable run, like beads on a string. While it is the easiest to install, it is highly susceptible to extreme voltage drop and end-of-line dimming. If a wire breaks early in the chain, every single light down the line goes dark.
- T-Method Layout: This layout runs a heavy 10 AWG or 12 AWG main trunk line from the transformer to a central point in the yard, where it splits into two or more smaller branch runs. This balances the load and significantly reduces voltage drop, making it an excellent choice for split-level yards or long driveways.
- Hub-and-Spoke Layout: The gold standard of professional landscape wiring. A heavy cable runs from the transformer to a centrally located, weatherproof junction hub. Individual fixture lead wires (typically pre-attached 25-foot runs) are then routed directly back to this central hub. This equalizes the wire length for every fixture, ensuring identical voltage delivery and perfectly even brightness. Furthermore, using a hub system can save up to 40% on overall wire usage compared to running separate home-run lines for every light.
Beyond layout, water mitigation is the single most critical factor in preventing system failure. Moisture wicking into wire jackets is a leading cause of underground corrosion. Cheap plastic “pierce-point” connectors included in big-box retail kits are notorious for failing after their first Indiana winter; freeze-thaw cycles pull the plastic apart, allowing water to seep in and corrode the copper strands.
To build a storm-resilient system, we use solid mechanical brass butt-splice connectors paired with dual-wall, adhesive-lined heat-shrink tubing. When heated with a torch, the internal adhesive melts and flows around the splice, creating a completely airtight, permanent, watertight seal that can withstand saturated soils and seasonal ground movement.
For comprehensive protection, we also recommend utilizing our professional exterior lighting installation services to ensure every connection is engineered to withstand the harshest midwestern weather.
Smart Automation and Integration with SPAN Panels
Modern landscape lighting has evolved far beyond basic analog dial timers and cheap plastic photocells that trigger at slightly different times, causing an uncoordinated, staggered look across your yard. Today, we integrate high-end lighting systems with cutting-edge smart home infrastructure to maximize energy efficiency, safety, and convenience.
For homeowners looking for the ultimate in electrical safety and modern control, we recommend integrating your outdoor lighting with a SPAN smart electrical panel. As a primary solution for safety and reliability, a SPAN panel allows you to monitor your home’s electrical load in real-time during severe Indiana spring storms. If a storm knocks out utility power and your home transitions to a backup battery or generator, the SPAN panel can automatically shed non-essential loads—like your landscape lighting—to preserve critical power for your refrigerator, sump pump, and heating systems. Once utility power is restored, the panel seamlessly re-energizes your outdoor lighting grid.
When it comes to daily automation, we utilize premium smart lighting control systems like Lutron Caséta and RadioRA 3 to deliver unmatched reliability. Grounded Solutions is Caséta and RadioRA 3 Certified, ensuring your system is designed and programmed with astronomical smart controls that replace traditional timers. These systems pull real-time local sunset and sunrise data via your home’s internet connection, automatically adjusting the on/off times as the seasons change.
To get the most out of these advanced systems, it is vital to select a certified installer who understands how to properly bridge indoor automation with rugged outdoor electrical grids. As certified experts, Grounded Solutions ensures that your smart switches are paired with compatible electronic low-voltage (ELV) dimmers to prevent annoying LED flickering and ensure smooth, silent dimming down to 1%.
By coordinating your smart home controls, you can easily tie your landscape lights to security sensors, creating a system that floods your driveway with bright light if motion is detected, or gently dims to a warm, inviting glow when you are entertaining on the patio.
To explore how these smart technologies can elevate your home’s safety and curb appeal, read our guide on installing outdoor lighting in your central indiana home.
Frequently Asked Questions About Outdoor Electrical Systems
To help you better understand the technicalities of outdoor electrical safety, we have compiled answers to some of the most common questions we receive from homeowners in Marion, Johnson, and Morgan counties.
Having a robust understanding of your home’s exterior power distribution is essential; you can learn more about this by reading about the benefits outdoor electrical outlets provide for modern residential properties.
Why do DIY landscape lighting systems frequently fail after Spring storms?
DIY landscape lighting systems almost always fail due to poor connection methods and inadequate physical protection. When a heavy spring storm saturates the soil, water easily penetrates cheap, non-waterproof plastic pierce connectors. This triggers immediate galvanic corrosion, eating away at the copper wire strands until the electrical connection is severed.
Additionally, shallowly buried wires are easily nicked by aerators, edgers, or burrowing pests, creating tiny entry points for moisture. Over time, water wicks up inside the wire jacket all the way to the fixture, destroying the LED driver. This is why hiring the professional team at Grounded Solutions is essential to ensure your system is built with commercial-grade, watertight connections that withstand the elements.
What are the NEC burial depth requirements for outdoor cables?
The National Electrical Code (NEC) has strict guidelines (specifically NEC Article 300.5) regarding underground wiring to protect residents from accidental electrocution and prevent utility damage:
- Low-Voltage (under 30V) Direct-Burial Cable: Must be buried at a minimum depth of 6 inches. We always recommend burying cables at least 6 to 8 inches deep in active garden beds where seasonal planting or mulching occurs to prevent accidental spade cuts.
- Line-Voltage (120V) UF (Underground Feeder) Cable: Must be buried at a minimum depth of 24 inches if buried directly in the earth, or 18 inches if enclosed in approved rigid nonmetallic conduit (such as Schedule 40 PVC).
Does my outdoor lighting system require a dedicated GFCI circuit?
Yes. Under NEC 411.4(A), Ground Fault Circuit Interrupter (GFCI) protection is mandatory for all landscape lighting transformers.
We highly recommend installing your outdoor lighting on a dedicated branch circuit. If your transformer shares a circuit with other high-draw outdoor appliances—like patio heaters, pool pumps, or power tools—the combined load can easily cause nuisance tripping. This is especially true during heavy rainstorms, when microscopic amounts of moisture on an outdoor outlet can trigger a shared GFCI breaker, shutting down your entire outdoor security grid.
Always ensure your outdoor outlets are protected by heavy-duty, “while-in-use” wet-location covers to keep wind-blown rain completely out of the receptacle.
Conclusion
A beautiful, reliable landscape lighting electrical setup is an investment in your home’s safety, value, and curb appeal. While cheap DIY kits might look tempting on a sunny afternoon, they rarely survive their first Indiana winter. Engineering a system that stands up to severe weather requires deep electrical expertise, precise voltage calculation, and heavy-duty, watertight materials.
At Grounded Solutions, we are proud to be central Indiana’s trusted, family-owned electrical contractor. Our team of fully licensed, bonded, and insured electricians is dedicated to delivering safe, high-quality work with transparent pricing. Whether you live in Beech Grove, Franklin, Whiteland, Southport, Mooresville, or anywhere across the greater Indianapolis area, we have the local expertise and certified smart home training to bring your outdoor spaces to life.
Ready to transform your home with a professional, storm-resilient landscape lighting system? Contact us today to schedule a consultation and experience the peace of mind that comes with hiring the certified experts at Grounded Solutions. Explore our full range of residential electrical services to get started!