

How to Fix a Light Switch Safely
Start with the simple checks: Try a working bulb and check for a tripped breaker. If the light still does not work, turn off the circuit at the breaker. If you notice any buzzing, heat, or scorching, leave the breaker off and contact a licensed electrician immediately.
I’m Clay Hamilton, president of Grounded Solutions, with over 20 years of experience in electrical and mechanical wiring, maintenance, and repair. I’ll use that experience to help you understand light switch problems safely and recognize when a repair requires professional service. When you need to fix light switch malfunctions in your home, a careful diagnosis protects both your family and your electrical system. Whether managing standard electrical repairs or learning how to safely inspect and reset a GFCI outlet, understanding how your circuitry functions is essential for residential safety.
How to Diagnose and Fix Light Switch Problems
Every homeowner eventually encounters a light switch that stops doing its job. You walk into a room, flip the toggle, and nothing happens. Before jumping to conclusions, it is critical to perform a systematic diagnosis so you do not waste time or introduce hazards into your electrical system.
When a switch fails, the underlying cause can range from a simple burnt-out lamp element to serious mechanical failure within the switch housing. In central Indiana, seasonal changes can also impact home electrical systems. Severe Spring storms frequently roll across Johnson and Marion counties, bringing sudden power surges, grid fluctuations, and elevated indoor humidity that can expose weak points in aging wiring.
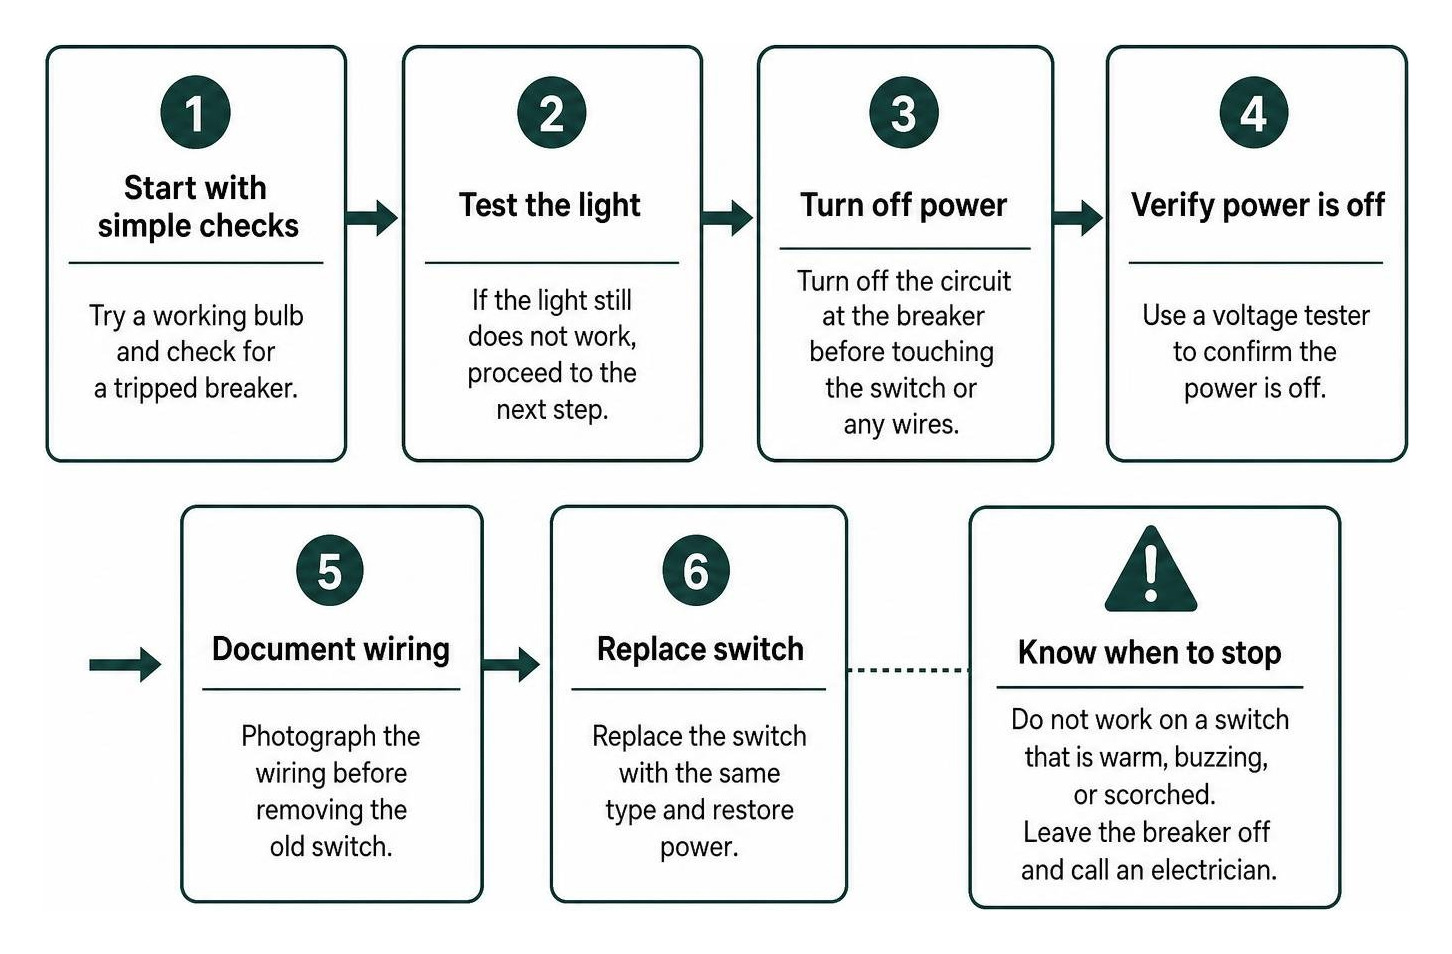
To diagnose the problem properly, begin by observing the physical behavior of the device. Does the toggle feel loose, mushy, or completely disconnected from the internal spring mechanism? Over years of use, the mechanical contacts inside standard switches degrade. Each time a switch is flipped, a tiny electrical arc occurs between the internal contacts. Eventually, those contacts pit, corrode, or lose tension, preventing electrical current from completing its path to the fixture.
If the toggle feels normal, the issue might be located elsewhere on the branch circuit. You can explore broader troubleshooting lighting issues to see how connected fixtures, shared neutrals, or upstream controls might be interrupting power delivery. Testing the switch directly with a digital multimeter can confirm whether continuity is broken across the terminals when the toggle is flipped to the ON position.
Signs of a Bad Wall Switch and Potential Hazards
A failing wall switch is not just an inconvenience; it can pose a genuine safety risk to your home and family. Faulty electrical devices and aged wiring remain leading causes of residential electrical fires. Recognizing the warning signs of a hazardous switch allows you to cut power before damage occurs.
- Audible Buzzing or Crackling: A switch should operate silently. If you hear a distinct buzz, sizzle, or popping sound when you flip the switch or while the light is running, it indicates internal electrical arcing. The spring contacts are no longer holding tight, allowing electricity to jump through air gaps and generate extreme heat.
- Warm or Hot Switch Plates: Wall switch plates should always feel cool to the touch. While some older rotary dimmers generate a slight, harmless warmth due to internal heat sinks, standard toggle and rocker switches should never be warm. A hot plate indicates high electrical resistance or loose wire terminations inside the junction box.
- Loose or Mushy Toggle Action: If the switch toggle does not snap crisply into place, or if you have to jiggle it to keep the light illuminated, the internal mechanical spring has failed. Continuing to use a switch in this state creates intermittent contact and increases fire hazards.
- Visual Discoloration or Scorching: Any signs of charring, melting plastic, or brown discoloration around the switch faceplate or screw holes signal severe overheating.
If you notice any of these severe signs, understand that identifying faulty home wiring is critical for home safety. Shut off the dedicated breaker at your electrical panel immediately and leave it off until the device and its wiring are inspected.
Ruling Out Circuit and Fixture Issues First
Before unscrewing a single switch plate, take a few minutes to eliminate external variables. Many service calls turn out to be simple fixture or circuit overloads rather than a bad wall switch.
First, check the light bulb itself. Bulbs can burn out unexpectedly, and modern LED bulbs can suffer from driver failure caused by grid fluctuations or lightning storms. Unscrew the bulb and test it in a known working lamp, or install a brand-new bulb into the fixture. Make sure the bulb is screwed firmly into the socket, as loose bulbs will fail to make solid contact with the brass tab at the bottom of the socket base.
Second, inspect your main electrical service panel. Head to your breaker box and verify that the corresponding circuit breaker has not tripped. A tripped breaker often sits in an ambiguous middle position between ON and OFF, sometimes displaying a small orange or red indicator window. To reset it, push the handle firmly to the OFF position until it clicks, and then switch it back to ON.
If the breaker trips again immediately, you are dealing with a direct short circuit or a severe ground fault somewhere along the line. Reviewing steps for evaluating common electrical problems can help you determine whether the overload stems from seasonal appliances like high-draw space heaters on the same circuit, outdoor landscape lighting damaged by rain, or attic wiring chewed by rodents.
Essential Safety Precautions and Professional Switch Replacement
Working with residential electrical systems demands absolute respect for safety protocols. Electricity is unforgiving, and while a wall switch may look simple from the outside, the wiring inside the junction box can present serious hazards if handled incorrectly. That is why Grounded Solutions always recommends professional diagnosis and replacement by a licensed electrician.

Before any hands-on inspection begins, a licensed electrician follows strict safety procedures. The dedicated circuit breaker is shut off at the main electrical panel, and a non-contact voltage tester is used to confirm zero voltage at the switch location before any wires are touched. If your panel is located in an area accessible to other household members, a breaker lock-out device or bright electrical tape over the breaker handle prevents anyone from accidentally flipping the circuit back on while work is in progress.
Following essential safety steps for home electrical work is mandatory for any electrical service call. Our team verifies that all conductors are de-energized, inspects the condition of the wiring insulation, and checks for signs of overheating or arcing inside the junction box before proceeding.
| Switch Configuration | Common Household Applications | Key Identifying Features | Terminal Types | Typical Circuit Role |
|---|---|---|---|---|
| Single-Pole Switch | Bedrooms, bathrooms, closets, utility rooms | Two brass terminal screws plus one green ground screw; ON/OFF stamped on toggle | 2 Hot brass screws, 1 Green ground | Controls a single fixture or group from one wall location |
| Three-Way Switch | Hallways, stairwells, large living rooms with two entrances | Three terminal screws (one dark common, two brass travelers) plus ground; no ON/OFF markings | 1 Dark Common screw, 2 Traveler screws, 1 Ground | Controls fixtures from two distinct wall locations |
| Dimmer Switch | Dining rooms, living areas, home theaters | Slider, rotary dial, or rocker with integrated microprocessor and heat sink | Pre-attached wire leads or screw terminals; often requires neutral | Modulates electrical waveform to adjust fixture brightness levels |
| Smart Switch | Whole-home automation, security lighting | Digital paddle with LED status light, wireless radio (Lutron Caséta, RadioRA 3) | Line, Load, Ground, and dedicated Neutral connection | Enables remote scheduling, scenes, and app-based lighting control |
Professional Light Switch Replacement Services
When a wall switch fails, replacing the worn device is the industry-standard solution. Wall switches are sealed units; their internal springs and silver-alloy contact pads cannot be rebuilt in the field. While general technical resources outline how to replace a wall switch, a licensed electrician from Grounded Solutions completes the replacement safely and correctly, ensuring every connection meets National Electrical Code requirements.
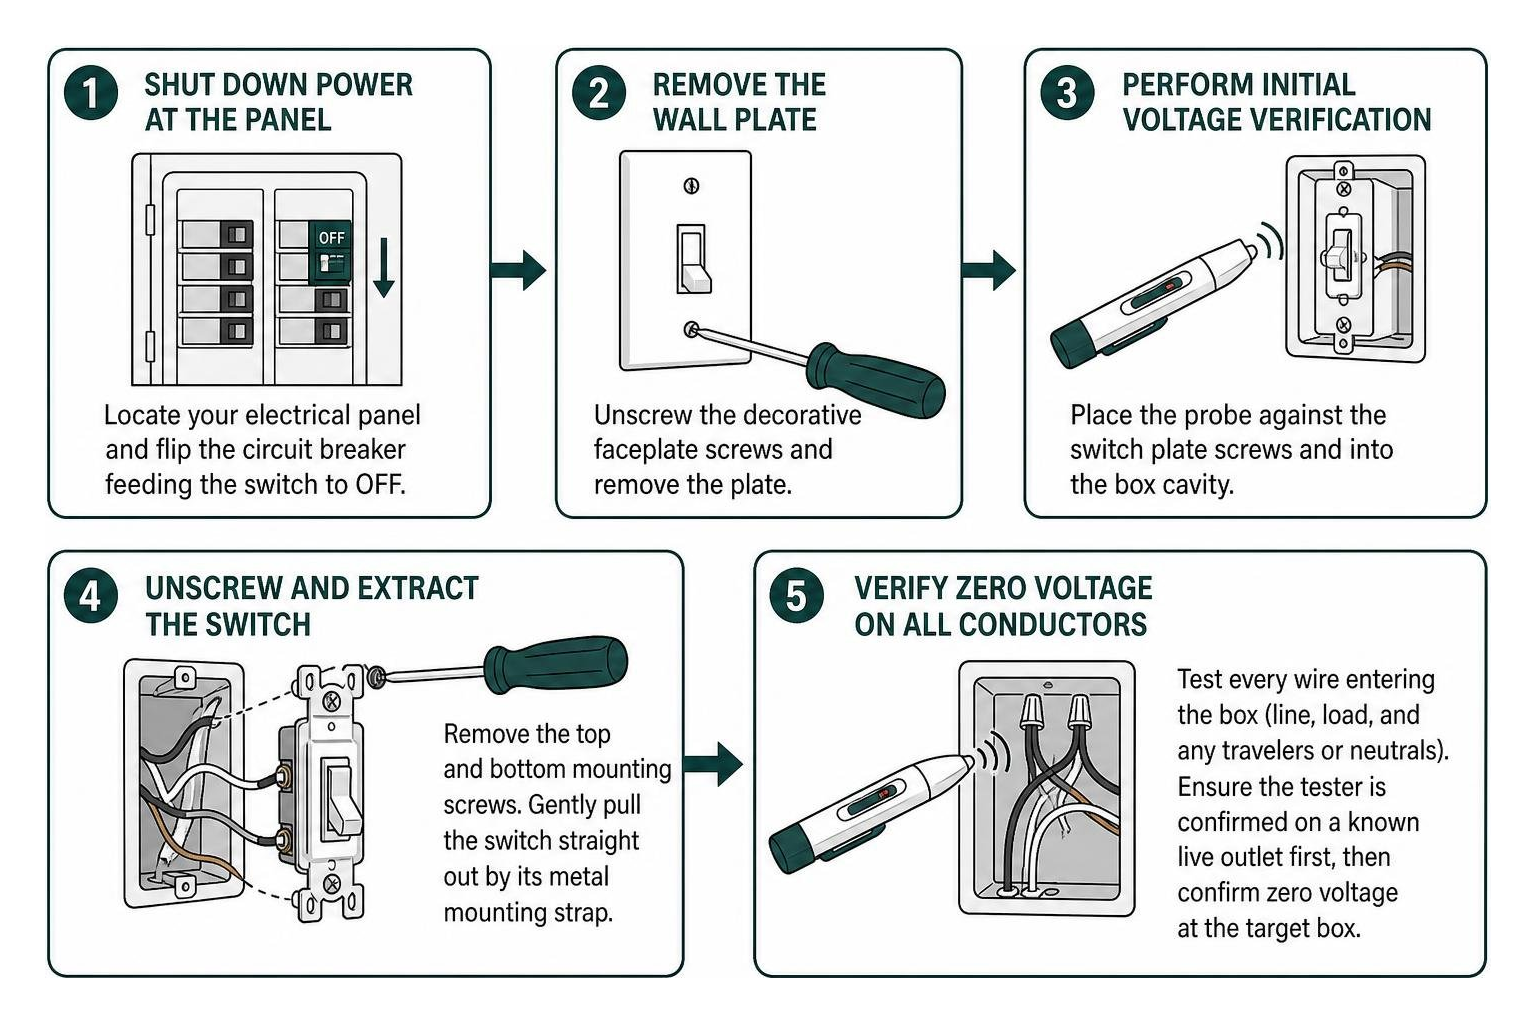
Our professional replacement process includes shutting down power at the panel, removing the wall plate, verifying zero voltage on all conductors, photographing the existing wiring for documentation, and installing a new switch with properly torqued terminal connections. We inspect the condition of the wiring inside the junction box, check for signs of overheating or arcing, and confirm that the circuit is properly grounded before restoring power.
Single-Pole Switch Replacement
Single-pole switches are the most common lighting controls found in residential construction. A single-pole switch acts as a mechanical gatekeeper on the hot conductor, breaking or connecting the flow of 120-volt current to the light fixture. During replacement, our electricians disconnect the old switch, inspect and prepare the conductors, attach the ground wire to the green grounding screw, and secure the hot conductors under the brass side screws with proper clockwise hook loops. We never use push-in backstab terminals, which are prone to loosening over time and creating fire hazards.
Three-Way and Dimmer System Replacement
Three-way switches and dimmer controls require a higher level of attention to wiring layout. A three-way circuit allows you to operate a single lighting load from two distinct locations, such as the top and bottom of a staircase or opposite ends of a large hallway. The critical wire is the common wire, which connects to the dark-colored screw terminal. The other two screws hold the traveler wires, which carry current back and forth between the two three-way switches. Mixing up the common wire with a traveler will cause the circuit to function only intermittently.
Upgrading to a modern dimmer switch elevates lighting comfort, but requires selecting an LED-rated control. Traditional incandescent dimmers alter the voltage waveform in ways that cause modern LED fixtures to flicker, drop out, or emit irritating sounds. If you are experiencing noise from your lighting controls, understanding resolving buzzing dimmer switches will help you identify driver incompatibilities and load minimum issues.
Modern smart lighting platforms like Lutron Caséta and RadioRA 3, paired with advanced SPAN smart electrical panels, deliver lighting automation, whole-home circuit safety, and resilient energy management during severe Spring storms. When planning lighting and panel upgrades, selecting a certified professional ensures proper communication architecture and load balancing across all circuits. Grounded Solutions is proud to be Caséta and RadioRA 3 Certified, bringing factory-trained expertise to homes throughout central Indiana.
Troubleshooting and When to Call a Professional
While replacing a standard switch is straightforward, older residential electrical systems and complex circuits can present severe safety challenges. Recognizing when a situation exceeds basic maintenance is essential for home preservation.
Stop work, leave the circuit breaker off, and consult an expert if you encounter any of the following field conditions:
- Knob-and-Tube or Cloth-Insulated Wiring: Homes constructed before 1950 often contain ungrounded knob-and-tube wiring. The insulation on these conductors is frequently brittle, dry-rotted, and prone to flaking off inside junction boxes, creating immediate short-circuit and fire risks when disturbed.
- Aluminum Branch Wiring: Common in homes built between 1965 and 1973, solid aluminum branch wiring requires specialized handling. Aluminum expands and contracts at different rates than copper, causing connections to loosen over time. Standard switches cannot be connected directly to aluminum wiring; doing so creates galvanic corrosion and extreme fire hazards. Special CO/ALR rated devices or professional AlumiConn micro-copalum terminations are legally required.
- Missing Grounding Conductors: If your electrical boxes lack a grounding path, installing three-prong devices or modern smart controls requires code-compliant grounding upgrades or GFCI protection upstream.
- Overcrowded Junction Boxes: If a switch box is crammed with multiple wire bundles, conduit feeds, and wire nuts, forcing a new switch inside can damage insulation and violate National Electrical Code (NEC) box-fill calculations.
- Recurring Breaker Trips: If replacing the switch does not resolve the issue and the breaker trips continuously upon activation, there is a short circuit, neutral-to-ground fault, or fixture failure along the branch run.
When facing these complex conditions, reviewing our guidance on deciding when to hire a professional will help you make the right choice for your family’s safety. Our licensed, bonded, and insured team handles comprehensive expert electrical repairs across central Indiana, ensuring every component meets current safety codes.
Frequently Asked Questions About Light Switch Replacement
Why is my light switch not working even after replacing it?
If a brand-new switch fails to illuminate the light, several common factors may be responsible. First, check whether an upstream Ground Fault Circuit Interrupter (GFCI) outlet on the same branch circuit has tripped. In many residential layouts, bathrooms, garages, basements, and outdoor receptacles share circuit wiring with lighting runs; a tripped GFCI downstream or upstream cuts power to all connected devices.
Second, verify your wire connections. A loose wire nut on a neutral bundle deep inside the junction box or an improperly tightened screw terminal will prevent current from flowing. Third, the failure may reside in the light fixture itself, such as a burned-out LED driver, a corroded socket tab, or damaged wiring in the ceiling canopy.
Can a faulty light switch start an electrical fire?
Yes, a faulty or improperly installed light switch is a documented fire hazard. When internal switch contacts wear out or terminal screws are left loose, electrical current must force its way across microscopic air gaps. This phenomenon, known as electrical arcing, generates temperatures exceeding several thousand degrees.
This extreme thermal energy quickly breaks down wire insulation, melts surrounding thermoplastic housings, and can ignite structural wood framing or drywall paper inside the wall cavity. Any switch that feels hot, hums, buzzes, or exhibits loose movement must be turned off at the breaker panel and replaced immediately.
Why should you hire a licensed electrician to replace a light switch?
While replacing a wall switch may appear straightforward, attempting electrical work without licensed expertise introduces significant risks of electrical shock, improper grounding, and fire hazards. When you hire Grounded Solutions, our service includes comprehensive safety diagnostics, panel evaluation, precise torque specifications on all terminations, NEC code compliance, and complete peace of mind. Professional service also ensures that hidden issues like junction box overcrowding, aluminum wiring oxidation, or missing ground paths are identified and permanently resolved.
Conclusion
A malfunctioning light switch disrupts your daily routine, but understanding how residential lighting circuits operate empowers you to identify issues early and keep your home safe. Always prioritize safety above all else: turn off the circuit breaker, verify zero voltage with reliable test equipment, and never ignore warning signs like buzzing sounds, warm faceplates, or scorched plastic.
When you want complete peace of mind, modern lighting controls, or advanced smart home integration, our team at Grounded Solutions is ready to help. As a local, family-owned electrical contractor based in Indianapolis, we serve homeowners and businesses throughout central Indiana, including Beech Grove, Franklin, Whiteland, Southport, and Mooresville. From installing intelligent Lutron Caséta and RadioRA 3 automation systems to upgrading main electrical service panels and solving complex wiring issues, we deliver top-tier craftsmanship and transparent, dependable service.
Stop living in the dark with faulty switches or unreliable circuits. Get in touch with our team today to schedule an inspection or lighting upgrade with our certified master electricians.