

When to Hire an Electrician to Fix Your High-Ceiling Lighting
When Ceiling Light Repair Needs an Electrician
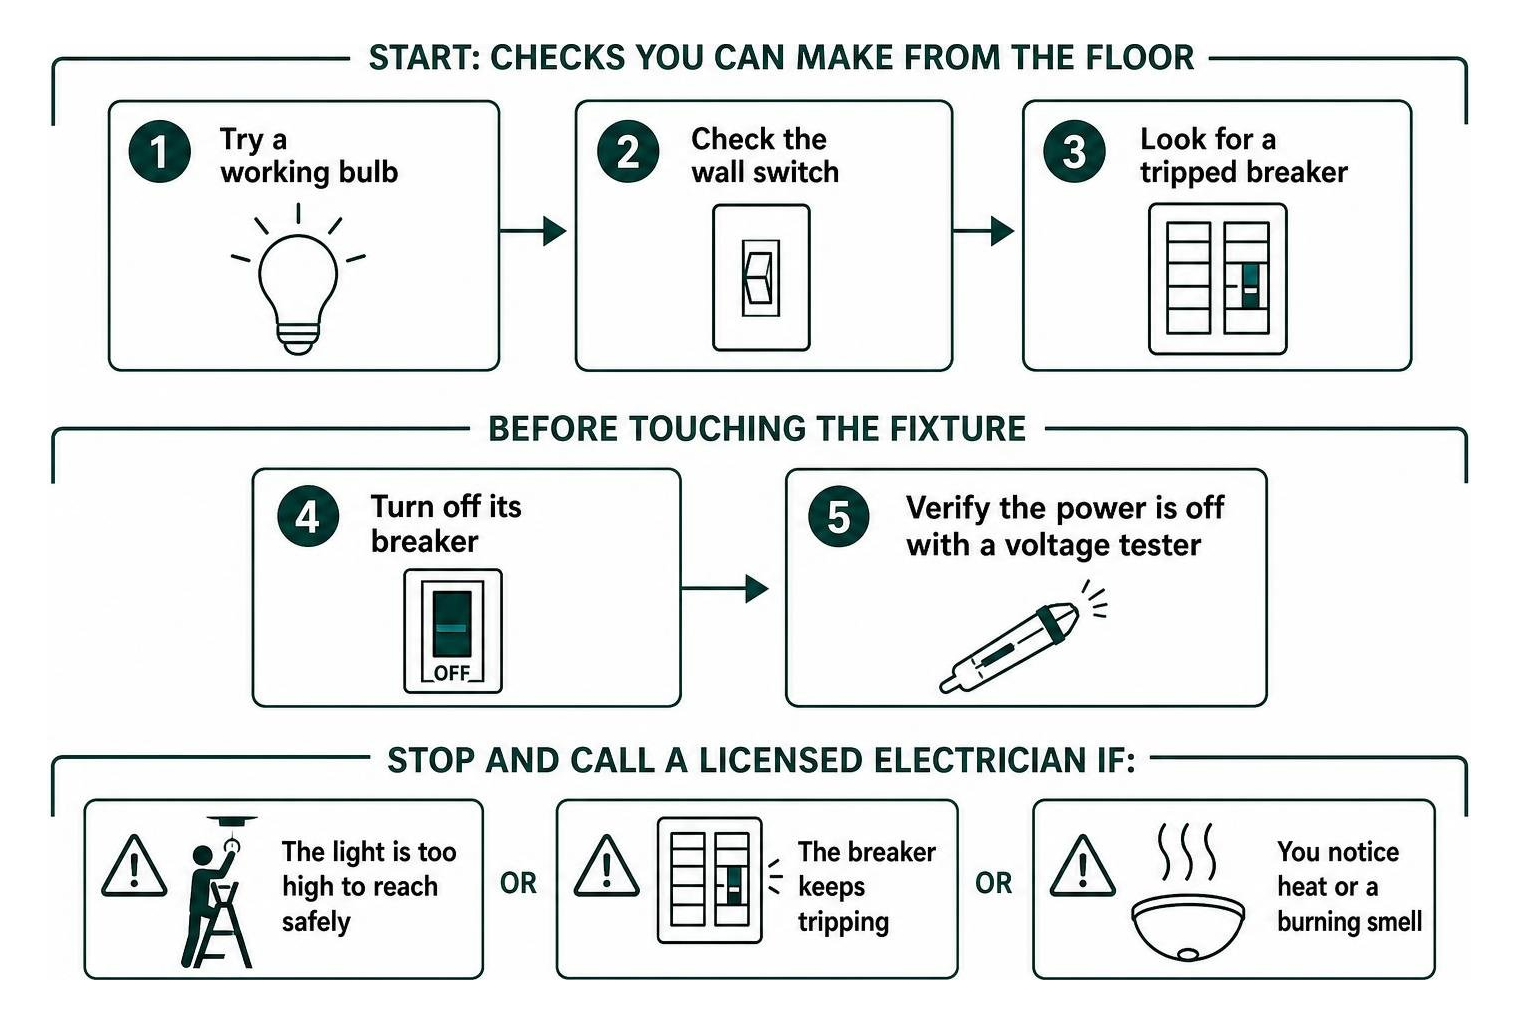
For ceiling light repair, start with the checks you can make from the floor: try a working bulb, check the wall switch, and look for a tripped breaker. Before removing a cover or touching the fixture, turn off its breaker and verify the power is off with a voltage tester. If the light is too high to reach safely, the breaker keeps tripping, or you notice heat or a burning smell, stop and call a licensed electrician.
I’m Clay Hamilton, president of Grounded Solutions. I bring more than 20 years of electrical wiring, maintenance, and electrical repairs experience to this guide on ceiling light repair, including when the safest next step is to hire a pro. Whether you are dealing with a dark fixture or need to fix a GFCI outlet on an associated branch circuit, Grounded Solutions is here to keep your home safe and fully powered.
Essential Safety Protocols Before Any Ceiling Light Repair
Handling any ceiling light requires an absolute commitment to safety. Working at elevated heights while interacting with household wiring introduces significant risks if proper procedures are not followed. Electrical safety demands that you cut power at the main electrical service panel before touching any housing, bracket, or conductor. Never rely strictly on a wall switch to protect you. Modern lighting circuits frequently carry switch legs or multi-wire branch circuits where neutral conductors remain connected, creating a severe shock hazard if an upstream breaker is still energized.

Once you switch the breaker to the off position, confirm that the circuit is completely de-energized using a reliable non-contact voltage tester. Test the tool on a known live circuit first, such as an active outlet or lamp, verify the indicator light and tone, then test the wires inside the fixture housing before touching them with bare hands or tools.
Working at ceiling height also introduces physical fall risks. Set up an OSHA-compliant, heavy-duty stepladder on a clean, solid, level surface. Never step on the top two rungs or lean excessively to reach a fixture. Wear safety glasses to protect your eyes from falling drywall dust or metal shavings, and use insulated hand tools rated for electrical work. If you notice repeated bulb failures while troubleshooting, understanding why light bulbs keep blowing can help you determine whether vibration, excessive voltage, or thermal trapping is the root cause. Following established safety protocols from organizations like esfi.org keeps your home and family protected throughout any lighting maintenance.
Safe Ceiling Light Repair: Troubleshooting Common Issues
Diagnosing Persistent Dark Fixtures and Flickering Bulbs
When a ceiling light stays dark after installing a new bulb, the cause often lies within the switch or the internal wiring connections. Identifying the common hazards that make lights flicker is essential, as rapid strobing or intermittent dimming frequently points to loose neutral conductors inside the junction box or an incompatible dimmer switch.
Traditional incandescent dimmer switches modulate voltage through basic resistance, whereas modern solid-state LED fixtures require precise pulse-width modulation or reverse-phase electronic low-voltage dimmers. An incompatible control unit causes internal components to overheat, leading to annoying buzzing sounds. Exploring why your dimmer switch is buzzing will clarify why pairing certified smart systems like Lutron Caséta or RadioRA 3 with matching LED loads eliminates both humming and flicker. Grounded Solutions is Caséta and RadioRA 3 Certified, ensuring optimal compatibility and smooth performance across all your automated lighting controls.
In high-efficiency fixtures, phantom voltage or induced voltage from adjacent cables can also disrupt electronic LED drivers. Drivers act as the power transformer for solid-state lights, converting 120-volt alternating current into steady direct current. When supply voltage fluctuates or neutral connections degrade, the driver enters an erratic cycle that mimics a failing bulb. These are conditions a licensed electrician can diagnose safely with professional testing equipment.
Professional Assessment for Sockets and Wiring
A common mechanical reason a ceiling light fails to illuminate involves the small metal tab at the bottom of the threaded socket. Over time, overtightening light bulbs bends this brass contact tab downward until it sits flush against the ceramic base, preventing electrical contact with the new bulb. While this may sound like a simple adjustment, working inside a live fixture housing carries real risk, and a professional assessment is the safest way to confirm the socket, wiring, and connections are sound.
A licensed electrician will de-energize the circuit breaker and verify the fixture is dead with a non-contact voltage tester before inspecting the socket. The brass contact tab can be gently lifted back into position, and the socket threads can be checked for corrosion or pitting. Minor oxidation may be cleaned with fine emery cloth or an electrical contact cleaner while power remains off. If the socket shows signs of heat damage or melted wiring, the socket assembly should be replaced by a qualified professional.
Recessed downlights also feature integrated thermal limit switches designed to cut power if the internal temperature exceeds safe operating thresholds. If attic insulation is packed tightly over a non-IC (Insulation Contact) rated can, or if an oversized bulb is installed, this switch trips automatically, leaving the light dark until the housing cools down. A professional can determine whether the fixture is rated for insulation contact and correct the underlying cause.
Securing Loose, Wobbly, or Sagging Light Fixtures
A ceiling fixture that sags or pulls away from the drywall poses an immediate mechanical and electrical hazard. Heavy vibrations, shifting framing, or improperly matched mounting hardware can cause brackets to back out of ceiling boxes over time.

When a fixture feels loose, a professional inspection should remove the decorative canopy to access the mounting crossbar. The electrician will verify that the screws securing the crossbar to the electrical box are tight and that the box itself is firmly anchored to structural ceiling joists. Standard plastic outlet boxes are only rated for lightweight loads and cannot support heavy fixtures or ceiling fans. If structural movement or stripped threads are present, the box may need to be replaced with a fan-rated or heavy-duty support box before the fixture can be safely remounted.
Advanced Fixture Care: Recessed Cans, Updates, and Replacements
Upgrading Recessed Can Housings to LED Wafer Lights
Traditional recessed can lights consume significant energy and often leak conditioned air into attic spaces. Replacing these bulky metal housings with modern, airtight, ultra-thin LED wafer lights provides superior illumination and excellent energy efficiency. This is a job best handled by a licensed electrician, who can safely manage the wiring and ensure the new fixtures are properly sealed and supported.
The process of replacing a recessed light depends heavily on whether your ceiling features remodel cans or new-construction housings:
- Remodel Cans: These housings are held in place directly against the drywall ceiling using four spring-loaded metal clips. A professional can release the clips, pull the can down, access the attached junction box, and disconnect the house wiring safely.
- New-Construction Cans: These units are fastened directly to ceiling joists with metal hanger bars during the framing stage. Extracting them from below without attic access requires releasing the inner can sleeve, clipping the internal support tabs, and detaching the junction box from its mounting plate.
Once the old housing is removed, a licensed electrician can wire modern LED wafer lights directly into the incoming Romex line using integrated junction boxes, snapping the ultra-thin light flush against the ceiling cutout. This upgrade improves both energy performance and the finished look of the room.
Cosmetic Updates vs. Complete Fixture Replacement
Not every aging ceiling light needs to be scrapped. If the structural wiring and socket insulation remain in sound condition, cosmetic updates can refresh the room’s design without altering underlying electrical circuits. Metal housings can be refreshed using high-heat spray paint, dated glass globes can be swapped for modern shades matching the fitter size, or exposed bulbs can be fitted with decorative metal cages.
When visual wear is accompanied by frayed wire leads, brittle insulation, or cracked porcelain sockets, changing a light fixture is the only safe choice to ensure long-term reliability and code compliance.
| Consideration | Fixture Repair / Cosmetic Refresh | Complete Fixture Replacement |
|---|---|---|
| Primary Indication | Minor socket oxidation, bent contact tab, dated color or finish | Cracked sockets, heat-damaged wiring, failing LED driver, severe corrosion |
| Safety Risk | Low to moderate; limited to component adjustment | High if outdated or degraded wiring is left in service |
| Energy Efficiency | Dependent on existing bulb socket type | High; integrates modern solid-state LED systems and smart controls |
| Structural Demands | Utilizes existing ceiling box and mounting setup | Allows upgrading to heavy-duty or fan-rated structural support boxes |
| Aesthetic Flexibility | Limited to paint, shades, and decorative trims | Complete freedom to modernize fixture style, color temperature, and beam spread |
When to Call a Professional for High-Ceiling and Complex Lighting Issues
Recognizing Hazardous Electrical Symptoms
Certain lighting symptoms point to deeper problems within your home’s electrical distribution system that require immediate professional diagnosis. If your circuit breaker trips repeatedly every time you flip a wall switch, you are dealing with a direct short circuit or a severe ground fault. Never force a tripped breaker back into the on position without identifying the underlying fault.
Other warning signs include:
- Burning odors or melting plastic smells near light fixtures or wall switches.
- Discolored, scorched, or brittle conductor insulation inside ceiling junction boxes.
- Switch plates that feel warm or hot to the touch during normal operation.
- Widespread fixture dimming across an entire room whenever major motor loads, like heat pumps or refrigerators, cycle on.
These symptoms often stem from common electrical problems with lights such as loose neutral connections or overloaded branch circuits. During heavy Spring storm seasons across central Indiana, severe weather, lightning strikes, and high winds can damage overhead service drops and weatherheads, causing voltage surges that compromise delicate lighting electronics. Upgrading to advanced SPAN panels alongside Lutron smart lighting controls delivers real-time circuit monitoring, dynamic load shedding, and superior surge resilience during volatile weather events. When hazardous electrical symptoms arise, professional intervention is necessary to prevent electrical fires.
When Ceiling Light Repair Becomes a Job for a Pro
Working on high fixtures in rooms with vaulted, cathedral, or two-story foyers presents severe safety challenges that go far beyond standard household maintenance. Standard step ladders do not provide the stability or height required to work on 15- to 20-foot ceilings. Licensed electricians utilize specialized multi-position ladders, scaffolding systems, and safety harnesses to navigate vaulted spaces securely.
Furthermore, replacing a lightweight fixture with a heavy chandelier or ceiling fan requires installing an electrical box physically rated and braced for heavy loads. Attempting to anchor a 40-pound chandelier to a standard retrofit box creates an immediate collapse hazard. When facing complex multi-way switching, high ceilings, or aging wiring, hiring an electrician for light fixture replacement ensures the job meets local building codes and National Electrical Code standards.
Frequently Asked Questions About Ceiling Light Repairs
Why is my ceiling light not working even after changing the bulb?
If a brand-new, working light bulb fails to light up, the issue is typically caused by a flattened brass contact tab inside the socket, a tripped circuit breaker, a loose wire nut connection in the ceiling junction box, or a failed internal electronic LED driver. A professional inspection can verify incoming voltage and isolate the exact point of failure.
What should I do if my ceiling light keeps tripping the circuit breaker?
A breaker that trips immediately indicates a short circuit, such as a hot wire touching a grounded metal enclosure or neutral wire, or a failed driver component. Switch the circuit breaker completely off and leave it in that position. Do not repeatedly reset the breaker, as this can cause arc damage inside your walls. Call a licensed electrician to isolate and repair the fault safely.
How is a damaged or corroded fixture socket repaired?
When a socket contact tab is flattened from overtightening or pitted from electrical arcing, a licensed electrician will verify the circuit is de-energized before evaluating the internal components. If the socket structure is sound, the contact tab can be carefully realigned and cleaned of oxidation. However, if there are signs of heat damage, melting, or severe corrosion, the electrician will replace the socket assembly or the entire fixture to ensure long-term fire safety.
Conclusion
Ceiling lighting plays a vital role in the beauty, comfort, and security of your home. While basic troubleshooting like swapping a bulb or adjusting a flattened socket tab is straightforward, high-ceiling fixtures, complex driver failures, and structural box replacements require specialized tools and expert training. Working on tall ladders near electrical wiring carries real risks, and safety should always come first.
At Grounded Solutions, we are dedicated to keeping your home bright, functional, and safe. As a local, family-owned and operated electrical contractor based in Indianapolis, our licensed, bonded, and insured electricians handle everything from intricate high-ceiling chandelier installations to comprehensive electrical repairs and smart lighting integration across central Indiana.
Whether you need assistance with a persistent lighting issue in Beech Grove, Franklin, Whiteland, Southport, Mooresville, or anywhere across the greater Indianapolis region, our team delivers high-quality workmanship and transparent communication on every project. Contact Grounded Solutions today to schedule your lighting repair or installation with our certified electrical specialists.