

How to Install Recessed LED Lights Safely
A professional LED recessed light installation begins with selecting fixtures that fit your ceiling, planning optimal layouts, and evaluating framing, plumbing, and electrical lines before cutting. Electricians verify the circuit is completely de-energized at the breaker with a rated tester, cut precise openings using fixture templates, route wiring, make secure junction box connections, and fasten the fixtures safely. In spaces with existing cans, a compatible LED retrofit kit can streamline the upgrade without cutting new ceiling holes.
I’m Clay Hamilton, president of Grounded Solutions, with more than 20 years of experience in electrical and mechanical wiring, maintenance, and repair. I’ll use that background to explain what goes into a safe LED recessed light installation and help you recognize when to call a licensed electrician.
Explore our related lighting guides:
Planning Your Recessed Lighting Layout and Fixture Types
A successful lighting upgrade begins long before anyone reaches for a ladder or a drywall saw. In our work across central Indiana homes, from historic properties in Franklin to newer builds in Whiteland and Southport, proper pre-planning makes the difference between an evenly balanced space and a room full of awkward shadows.
When you configure your ceiling, you need to account for your ceiling height, joist orientation, and how the light washes across vertical surfaces. Modern canless LED lights are dramatically simpler than traditional recessed lighting. What used to take 45 to 60 minutes per fixture can now take just 15 to 20 minutes because the bulky metal canister has been completely eliminated. Understanding how to integrate these fixtures with ambient lighting strategies ensures your overall lighting design feels cohesive and functional.
| Feature | Canless Wafer LED Fixtures | Retrofit LED Conversion Kits |
|---|---|---|
| Primary Use | New cutouts, drywall remodels, shallow joist spaces | Upgrading existing 4-inch, 5-inch, or 6-inch metal cans |
| Ceiling Depth Required | Ultra-thin (often 1/2 inch to 2 inches) | Requires existing metal housing depth (5 to 7 inches) |
| Electrical Junction | Remote driver box with push-in wire terminals | Screws directly into existing E26 or GU24 socket base |
| Mounting Mechanism | Spring-loaded tension clips directly against drywall | Torsion spring arms or friction blades inside existing can |
| Ceiling Joist Obstructions | Can often sit directly beneath a joist due to thin profile | Restricted entirely by the existing canister location |
| Air Leakage Control | Integrated foam gasket seals directly to drywall ceiling | Depends on housing seal; foam gaskets recommended |
Choosing between these two approaches allows you to prioritize energy-efficient lighting upgrades that deliver reliable illumination while trimming unnecessary electrical consumption.
Canless Wafer Lights vs. Retrofit Conversions
If your home already has traditional recessed cans installed in the ceiling, retrofit LED inserts are an outstanding shortcut. With a retrofit kit, you simply remove the existing incandescent bulb and decorative trim baffle, attach the included Edison-style E26 socket adapter into the existing light socket, snap together the quick-connect plug, and compress the torsion spring arms to slide the new unit flush into the existing canister. This process is ideal when replacing outdated halogen fixtures or when you are focused on converting old fluorescent recessed lights into modern, long-lasting LED arrays without cutting into the ceiling substrate.
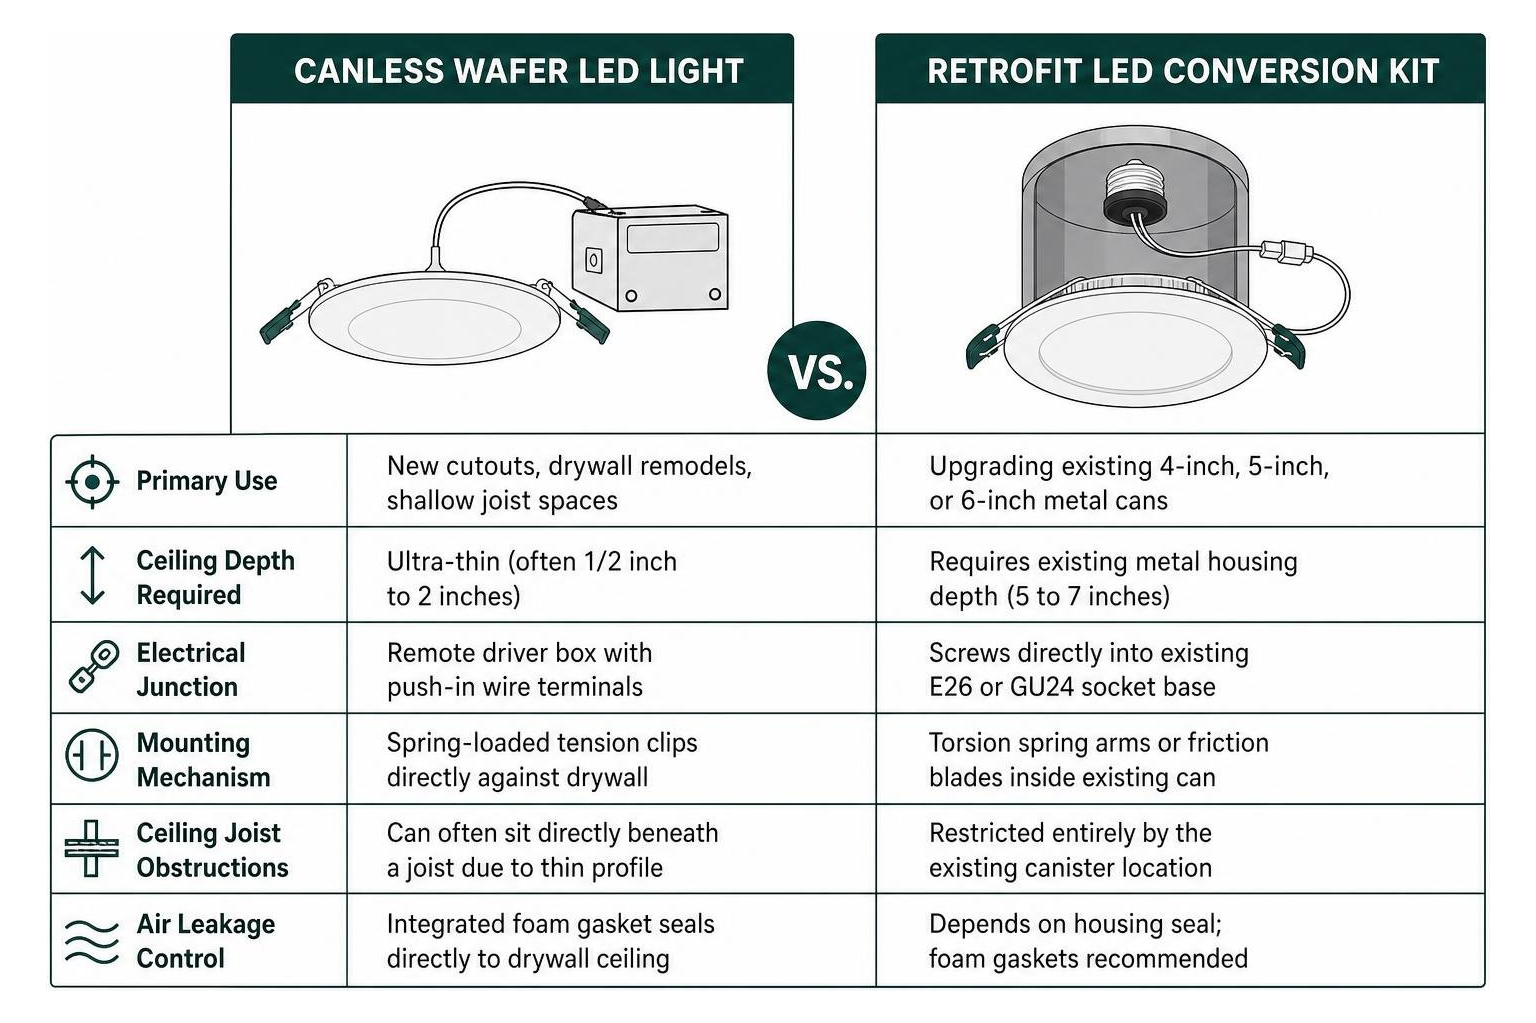
Canless wafer lights, on the other hand, eliminate the heavy metal canister entirely. Modern canless fixtures weigh under a pound in most cases and include a compact, remote metal junction box containing the integrated LED driver. Because these wafer-thin pucks are barely thicker than a standard sheet of 1/2-inch drywall, they can fit in places traditional cans never could, even beneath ceiling joists, low-clearance attic ductwork, or between floor levels where vertical space is limited.
Spacing, Lumens, and Color Temperature Guidelines
Proper downlight placement requires balancing overall illumination without creating glare or harsh beam intersections. A reliable rule of thumb for general room lighting is to space fixtures 4 to 6 feet apart and position them 2 to 3 feet from walls. If the downlights are arranged in a linear path, maintaining a minimum gap of 4 feet between fixtures prevents blinding hot spots and overlapping shadows.
Positioning fixtures roughly 2 feet away from perimeter walls creates an attractive wall washing effect that bounces indirect light back into the living area, visually expanding the room. To prevent the ceiling fan blades from slicing through the light beam and creating an annoying strobe effect in your living room, always map your downlights well outside the fan blade sweep.
Color temperature selection fundamentally shapes the atmosphere of your space:
- 2700K to 3000K (Warm White): Delivers a soft, inviting yellow tone that feels relaxing and cozy, making 3000 Kelvin light perfect for bedrooms, family rooms, and formal living spaces.
- 3500K (Neutral White): Provides a balanced, clean white light suited for transitional spaces, hallways, and home offices.
- 4000K to 5000K (Cool White / Daylight): Produces a crisp, energizing light that enhances visibility. LEDs in the 4000 Kelvin to 5000 Kelvin range are perfect for bathrooms, kitchens, laundry rooms, and garages where detailed task lighting is critical.
Most quality modern LED downlights feature an adjustable correlated color temperature switch on the driver box, allowing you to fine-tune the Kelvin setting between 2700K and 5000K before snapping the fixture permanently into the ceiling.
Preparation, Safety Protocols, and Required Equipment
Working with residential electrical systems demands absolute care and thorough preparation. Before beginning any lighting project, you must ensure that all components and materials comply with National Electrical Code (NEC) standards and carry proper safety certifications. High-quality integrated LED modules carry ETL or UL safety certifications along with FCC compliance to prevent electromagnetic interference on your home network, and they are typically rated for 50,000 or more hours of maintenance-free operation.
What a Professional Evaluates Before Installation
A licensed electrician begins every recessed lighting project by confirming the existing circuit can safely support the added load. In homes throughout Mooresville and Beech Grove that still utilize older 100-amp electrical panels, adding substantial lighting loads alongside high-draw appliances or space heaters can strain the service entrance. A professional load assessment identifies whether your panel has adequate capacity or whether a dedicated lighting circuit is required.
Before any ceiling work begins, the electrician verifies the power status at the main service panel. Never rely on a wall switch to isolate electrical power because switch loops and multi-wire branch circuits can leave live current inside ceiling junction points even when the wall switch is toggled off. The specific circuit breaker is switched completely off, and the wires at the existing fixture or switch box are tested with a verified non-contact voltage tester.
A stud finder is then run across the intended ceiling locations to verify that no structural framing, hidden plumbing lines, or HVAC supply trunks will be compromised. If existing branch circuits are discovered during planning, the electrical load is calculated to confirm that adding new fixtures will not overload an existing 15-amp or 20-amp lighting circuit.
Why Professional Installation Matters
While the tools and materials involved in an LED recessed light installation are readily available at home improvement stores, the expertise required to use them safely is not. Grounded Solutions electricians arrive with the right equipment for every scenario, including non-contact voltage testers, abrasive hole saws with dust bowl attachments sized precisely to fixture templates, wire strippers and cable cutters for preparing 14-gauge or 12-gauge non-metallic sheathed cable, fish tape or flexible fiberglass running rods for pulling cable through joist bays, stud finders to detect joists and framing members, push-in wire connectors or wire nuts rated for residential branch circuit wiring, cable clamps and NM knockout connectors to secure incoming cables into junction boxes, and full personal protective equipment including safety goggles, dust masks, and work gloves.
More importantly, professional installation ensures every connection is made correctly the first time. Improperly secured wiring, poorly seated junction boxes, and incorrectly rated fixtures are leading causes of flickering lights, tripped breakers, and fire hazards behind closed ceilings. When you work with Grounded Solutions, you receive a code-compliant installation backed by our licensed, bonded, and insured team.
What to Expect During Professional LED Recessed Light Installation
Once safety checks are complete and the layout is marked on the ceiling, the physical installation begins. Following manufacturer guidelines, such as standard manufacturer flat panel installation guidelines, ensures each connection remains secure, airtight, and code compliant.
Precision Ceiling Work and Wire Routing Without Attic Access
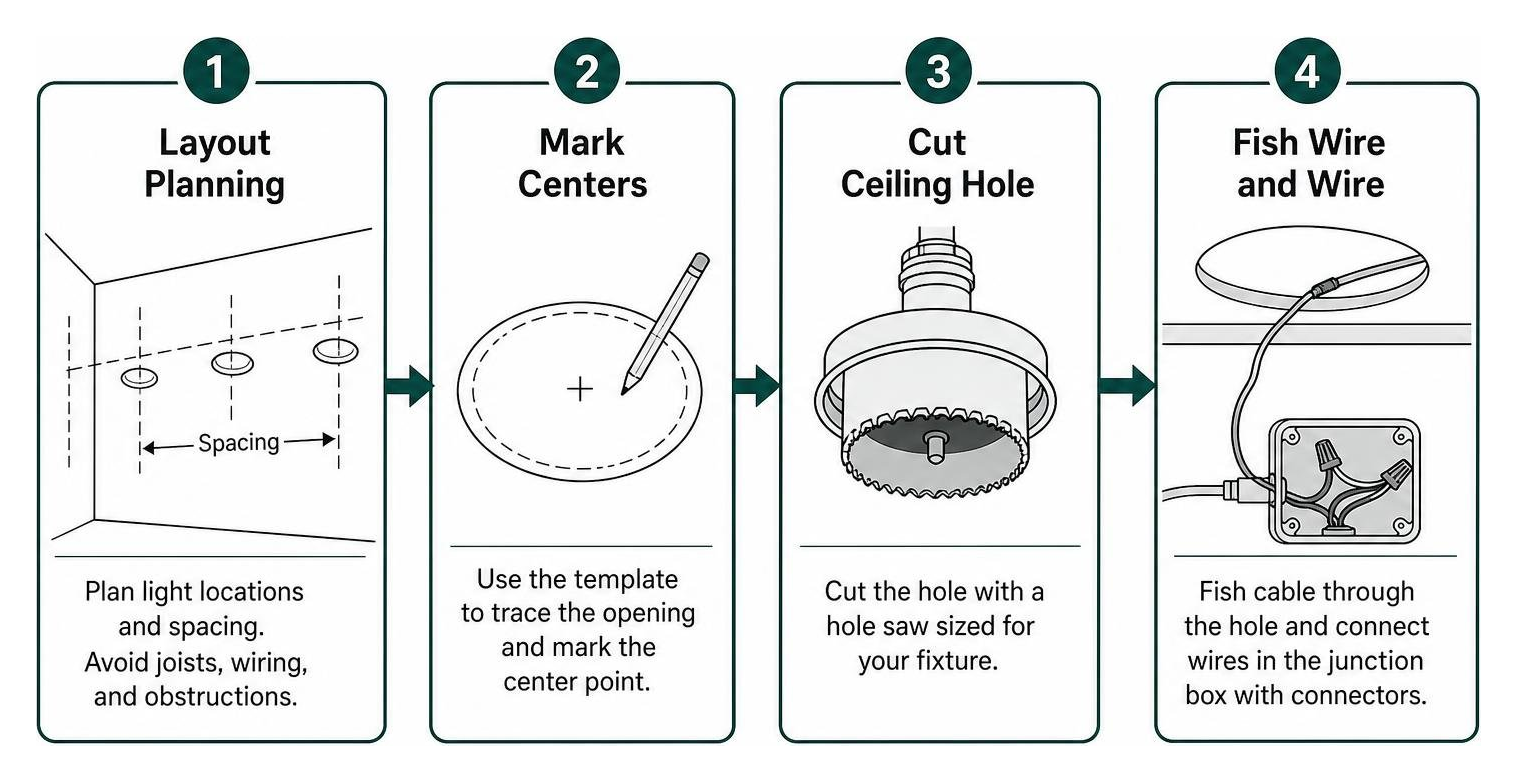
When installing recessed downlights on a finished lower level without attic access above, all drilling and wire fishing must happen through the fixture cutouts themselves. A professional electrician handles this process with precision and dust control.
- Mark the Center Point: The cardboard template provided in the lighting kit is used to trace the precise circular circumference onto the drywall.
- Cut with Dust Control: The hole saw is fitted with a dust bowl attachment that captures gypsum dust, keeping your flooring and furnishings clean throughout the process.
- Inspect the Cavity: A flashlight is used to inspect the ceiling cavity, verifying there are no plumbing pipes or electrical conduits crossing the opening.
- Fish the Romex Cable: Fish tape is fed from the first hole toward the power source or switch box. The 14/2 or 12/2 NM-B wire is secured to the fish tape loop with electrical tape and gently pulled through the ceiling cavity. This process is repeated from hole to hole, daisy-chaining the line between all planned fixture locations while leaving roughly 12 to 18 inches of wire slack hanging down from each cutout.
Wiring Multiple Fixtures Correctly
Recessed lights on a single switch circuit must be wired in parallel. This configuration ensures that line voltage is supplied equally to every light and that if a single LED module fails in the future, the remaining fixtures on the circuit continue to illuminate normally.
Inside each fixture’s remote junction box, a professional electrician:
- Secures the Cable: A knockout tab on the metal junction box is removed and a push-in NM cable connector is installed to protect the wire sheathing from sharp metal edges.
- Strips the Conductors: Approximately 6 inches of the outer NM cable jacket is stripped away, and 1/2 inch of insulation is removed from the individual black (hot), white (neutral), and bare copper (ground) conductors.
- Makes Parallel Connections: Incoming and outgoing lines are joined using push-in connectors or UL-listed wire nuts. Black connects to black, white to white, and bare copper to the fixture ground wire or chassis ground screw. When dealing with complex branch circuits or older wiring configurations, following practical ceiling rewiring techniques helps maintain circuit integrity throughout the system.
- Closes and Seals: The conductors are folded neatly into the junction box, the metal cover is closed firmly until it snaps, and the rubber or foam perimeter gasket is seated to meet ASTM E283 airtight installation standards. This prevents heated or conditioned air from escaping into the ceiling plenum.
Mounting Canless Wafers and Retrofitting Existing Cans
For canless wafer lights, the metal driver junction box is tucked up through the drywall cutout so it rests flat on the upper surface of the ceiling drywall or mounts to a nearby joist. The low-voltage multi-pin connector extending from the junction box is plugged into the wafer downlight, and the threaded locking collar is screwed tight. The two spring-loaded tension clips are folded upward against the sides of the fixture, the light body is pushed up into the drywall opening, and the springs are released. The clips snap downward against the top of the drywall, pulling the fixture trim tight against the ceiling.
If you are instead updating standard light fixtures inside existing metal canisters, the fixture’s torsion spring arms are compressed and hooked into the interior slots inside the housing. The retrofit downlight is pushed upward until its trim ring sits flush with the ceiling, verifying that the foam gasket creates an airtight seal around the opening.
Avoiding Common Problems and When to Call a Licensed Electrician
Recessed lighting upgrades appear straightforward on the surface, but small oversights can lead to flickering lights, damaged drywall, or dangerous fire hazards behind closed ceilings. Understanding these risks helps homeowners recognize why professional installation is a worthwhile investment.
Common Installation Problems to Prevent
- Oversized Hole Cutouts: Cutting a hole even 1/4 inch too large prevents the fixture’s outer trim flange from covering the drywall edge, resulting in unsightly gaps that require messy drywall patching. Professional installers measure twice and use the exact manufacturer template every time.
- Pinched or Unprotected Wiring: Forcing wires against metal edges without protective knockout bushings can slice through the conductor insulation over time, creating dead shorts and tripping breakers.
- Omitting the Foam Draft Gasket: Skipping the airtight sealing gasket allows conditioned room air to draft into attic spaces, increasing heating and cooling bills and inviting condensation inside ceiling cavities.
- Incompatible Dimmer Switches: Standard incandescent dimmers often lack the electronic components required to regulate low-voltage LED drivers smoothly. Installing an incompatible dimmer leads to annoying buzzing noises, strobing, or a restricted dimming range.
- Non-IC Fixtures in Insulated Ceilings: Placing non-Insulation Contact (non-IC) rated fixtures directly against fiberglass or blown cellulose insulation creates dangerous thermal buildup. Professional installers always confirm that canless wafers or retrofit housings are explicitly stamped with an IC rating for direct insulation contact.
When to Call a Licensed Electrician
Certain ceiling and electrical conditions demand the expertise of a licensed professional. If your home in Indianapolis, Greenwood, or Bargersville has legacy wiring, such as ungrounded cloth-insulated wiring, aluminum branch circuits, or active knob-and-tube runs, tying in modern LED fixtures requires comprehensive safety evaluations. Understanding whole home rewiring insights can help you identify whether your current electrical infrastructure can safely support your renovation goals.
You should also engage a professional when:
- Adding new dedicated lighting circuits from a main panel that is already near full capacity, or upgrading to a SPAN smart electrical panel to ensure ultimate safety, circuit management, and storm resilience across Central Indiana.
- Navigating structural ceiling elements, such as engineered I-joists or heavy timber framing that cannot be notched or drilled without compromising structural integrity.
- Integrating advanced lighting control networks and smart dimming. Grounded Solutions is Caséta and RadioRA 3 Certified, giving you reliable, professionally tuned Lutron smart lighting controls.
- Ensuring all work meets strict local building codes and inspection standards outlined in our Indianapolis electrical installation standards.
For complex configurations or older homes requiring updated circuits, relying on professional home rewiring services ensures the entire system remains safe, durable, and code compliant. Grounded Solutions handles every aspect of LED recessed light installation, from initial load calculations to final trim placement, so you never have to worry about hidden hazards or code violations.
Frequently Asked Questions About Recessed LED Setup
Can I install canless recessed LED lights without attic access?
Yes. Canless LED wafer lights are specifically engineered for remodel installations where there is no access to the space above the ceiling. Because the junction box and wafer fixture are designed to pass directly through the circular hole cut into the drywall, licensed electricians can fish non-metallic sheathed cable from cutout to cutout entirely from below. The integrated spring tension clips secure the fixture directly to the drywall surface without needing access to overhead framing.
How many recessed LED lights do I need for my room?
To determine the ideal number of lights, calculate the room’s total square footage and multiply it by 1.5 to find the target wattage equivalent, or multiply square footage by 30 to 40 to determine the total lumens required for general ambient illumination. For a typical 12-foot by 16-foot living room (192 square feet), you will need roughly 6,000 to 7,500 lumens. If you select 6-inch LED downlights that output 800 to 1,000 lumens each, installing 6 to 8 evenly spaced fixtures will provide balanced, glare-free coverage across the entire space.
Why are my new LED recessed lights flickering on a dimmer switch?
Flickering almost always points to an incompatible or overloaded dimmer switch. Older legacy dimmers designed for incandescent bulbs require a higher minimum electrical load (often 40 to 60 watts) to operate steadily. Because modern LED fixtures consume very little power (often just 9 to 12 watts per light), the total load may fall below the dimmer’s operational threshold. Upgrading to a digital LED-rated dimmer, such as a Lutron Caséta or Diva LED+ switch engineered for electronic low-voltage drivers, eliminates humming, prevents strobing, and delivers smooth dimming performance down to low output levels. Grounded Solutions is Caséta and RadioRA 3 Certified, ensuring all Lutron smart controls are correctly paired and calibrated for your home.
Conclusion
Upgrading to modern recessed LED lighting is one of the most impactful improvements you can make to your home. By swapping out dated, drafty fixtures for sleek, energy-efficient canless wafers or high-performance retrofit inserts, you gain superior light distribution, lower monthly utility bills, and a clean ceiling aesthetic that elevates your entire living environment.
Whether you are remodeling a kitchen, finishing a basement, or adding layered lighting across your living areas, getting the wiring, layout, and circuit loads right is critical for long-term safety and performance. At Grounded Solutions, our licensed, bonded, and insured electricians specialize in residential and commercial lighting transformations across central Indiana, including Indianapolis, Greenwood, Whiteland, Franklin, Southport, and Mooresville. As a Caséta and RadioRA 3 Certified installer with expertise in modern SPAN smart panels, we deliver clean, code-compliant installations backed by transparent communication and decades of trade experience.
Ready to brighten your home with flawless recessed downlights? Explore our professional LED lighting installation services or contact Grounded Solutions today to schedule your consultation and bring modern illumination to your space.